Thursday, October 10, 2013

Opor Ayam Spesial


Untuk resep ini, saya yakin hampir semua sudah punya resep favorit masing2. Tapi yang ini adalah resep favorit di keluarga kecil kami. Setelah melalui berkali2 uji coba, menurut saya yang ini sudah pas banget rasanya. Cocok banget dengan lidah kami, sampai anak2 yang sampai saat ini masih anti dengan hidangan bersantan, mau makan dengan opor ini! Gak sia2 kan trial and errornya #emak nyengir lebar.

Yang pasti, ayamnya empuk dan lembut, kuahnya yumeeeeh abissssssssss. Wanginya jg bikin pingsan deh, apalagi proses bumbunya 2x, pertama disangrai dulu (proses ini aja sdh bikin bumbu2 jadi berbau khas), lalu ditumis. Aduhayyyy bgt deh pokoknya. Nah supaya mengurangi rasa eneg akibat makan opor terus menerus, saya tambahin 1 buah belimbing wuluh, mantap bgt. Gak usah khawatir, gak bikin kuah jadi asem kok, malah jadi enaaaak tenan. Oya kalo tidak ada belimbing wuluh bisa diganti dengan lime kok. 

Trus apa lagi sih istimewanya? Kebanyakan resep opor yang saya tau, ngga menggunakan terasi dan gula merah. Tp aseli, ini berpengaruh banget ke rasa lho (menurut saya :D )

Demikian resepnya ya :

12 potong ayam  (about 1,3 kg)
3-4 lembar daun jeruk
1 belimbing wuluh, potong2
2 sdt gula merah
2-2,5cm lengkuas, digeprek
500 ml santan kental
300-400 ml santan cair/air
2 lembar daun salam
3-4 sdm minyak goreng
garam
4 butir telur rebus (optional)

Sebagian di sangrai, lalu diblender : 
10 butir kemiri
10 butir bawang merah
5 bawang putih
2 buah cabe merah (optional)
2,5 cm jahe
1,5 sdt ketumbar (bisa juga pake yang bubuk)
1 tsp of jintan (bisa juga pake yg bubuk)
1/2 tsp lada
1 sdt terasi


Cara membuat :
1. Sangrai bawang merah, putih, cabe, kemiri, jahe dan terasi sampai wangi dan berubah warna sedikit. Blender dengan ditambah kemiri, jintan, lada.
2. Tuang minyak goreng, masukan blenderan bumbu ditambah lengkuas geprek, daun jeruk dan daun salam. Tumis hingga wangi. 
3. Masukkan potongan ayam, masak sampai berubah warna (ayam sudah tidak pink lagi). Tambahkan garam dan belimbing wuluh.
4. Masukkan santan, aduk2 terus menerus sampai mendidih. Kecilkan api, dimasak hingga ayam menjadi empuk dan air sudah berkurang sekitar 40-50 menit. Bila menggunakan telur rebus, masukkan. 
5. Hidangkan dengan bawang merah goreng.


ENGLISH VERSION 


OPOR AYAM / Chicken cooked with coconut milk

What so special about this opor ayam? I believe most of us must have our own favorite recipe of opor ayam. But the one that I made was from trial and error for so many times until I come out with this recipe. Some of the ingredients were roasted first, and then stir fry. I believe that's what makes it taste so good. 

This dish commonly serve during Lebaran celebration in many provinces in Indonesia, or any special occasions. Usually paired with beef rendang and sayur labu siam, the trio combination can caused craving for more and more and more.

So readers, here is the recipe : 

12 pcs of chicken (about 1,3 kgs)
3-4 kaffir lime leaves
1 belimbing wuluh, sliced
2-2,3cm galangal, smashed
2 tsp of palm sugar
500 ml coconut milk
300-400 ml thin coconut milk/water
2 bay leaves
3-4 tbsp of cooking oil
salt
4 eggs, hard boiled (optional)

Pan roasted and grind the following into spice paste :
10 candlenut
10 shallots
5 garlic
2 chilli (optional)
2,5 cm ginger
1,5 tsp corriander seed (you can use corriander powder as well)
1 tsp of cumin seed (you can use cumin powder as well)
1/2 tsp pepper
1 sdt shrimp paste


how to :
1. Pan roast/stir fry without oil, shallot, garlic, chilli, ginger, candlenut, shrimp paste until a little bit brown and fragrant. Process in a blender, add in the corriander seed, cumin seed, pepper until smooth
2. Heat the cooking oil, pour in the spice paste, add in the mashed galangal, kaffir lime leaves and bay leaves. Continue stirring until fragrant, about 2 minutes.
3. Add the chicken pieces and cook until it change color (no longer pink), add salt and sliced belimbing wuluh (you can use half of lime as a substitute of belimbing wuluh)
4. Pour in the coconut milk and the thin coconut milk/water, stirring continuously is required on this stage. After boiling, reduce the heat, cook until the liquid reducing and the chicken is tender about 40-50 minutes.
5. Serve with fried shallots

Wednesday, October 9, 2013

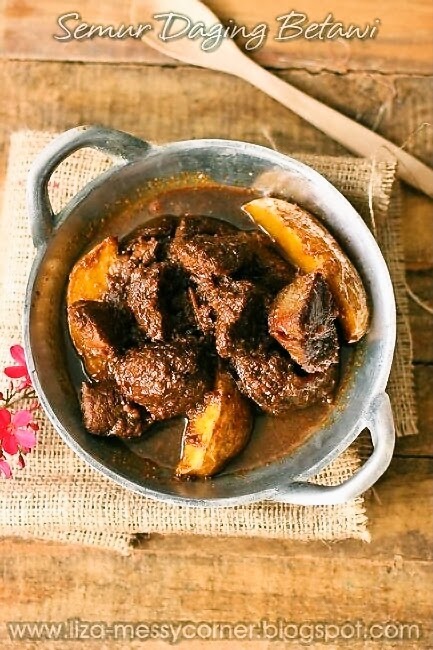
Semur Daging Betawi


Lebaran yang lalu, seorang teman dalam dunia perdapuran saya mem-posting resep semur betawi. Glek! Langsung penasaran sama rasanya, karena semur betawi memang berbeda sekali rasanya dibanding semur2 lain yg cenderung encer. Saya betul2 berharap banyak dari resep ini, percaya deh pokoknya sama Jeng Pity, karena kedua ortu nya kebetulan memang orang betawi :D 

Jadi langsung nyontek ke dapur Jeng Pity deh, tp pertama kali saya buat menggunakan ayam, begitu jg dengan yang kedua dan ketiga, hihihiihihihihi. Nah yang difoto ini kebetulan pas bikin yang pake daging sengkel.

Hati2 ya temaaaans, dijamin ketagihan! apa sih rahasia semur ini? Menurut saya, ada di penggunaan kelapa parut yang disangrai hingga wangi dan ditumbuk sampai berminyak! That's it. Semurnya kental dan very fragrant, kecium kemana2 sampe yang masak nyaris pingsan :D 


Saya membuat adjustment sedikit di bumbu2 nya, waktu pertama buat ngikutin plek punya Ipit dengan  bawang merah putih yang sebagian diiris, sebagian dihaluskan. Berikutnya dan seterusnya, semua bahan saya campur aja dan diblender. It taste the same, aseli gak ada perubahan :D Jadi saya pake yang praktis aja. Makasih ya Piiiit, untuk men-share resep turun temurun keluarga lo ini. Semoga berkah buat keluarga lo yaaa, resep ini sudah menyenangkan banyak orang dan juga mengeyangkan banyak perut :P


Demikian resepnya ya  :


SEMUR BETAWI

1 kg daging sengkel
2-3 sdm kelapa parut, sangrai hingga wangi dan kecoklatan
250ml kecap manis
3 cups of water / 750 ml air
2 sdm minyak goreng
3 buah kentang, potong empat lalu goreng setengah matang

haluskan dengan blender : 
10 bawang merah
4 butir bawang putih
5 butir kemiri
2 cm jahe

2 batang sereh, geprek
1cm lengkuas, geprek
3 helai daun salam
1/2 buah pala, parut
garam
merica

How to :
1. Lumuri daging dengan bumbu halus, tambahkan 50ml kecap manis dan 2 sdm minyak goreng, dimasak sampai daging mengeluarkan air. Masukkan sereh, lengkuas, daun salam dan pala parut.
2. Sangrai kelapa parut hingga wangi dan berubah warna, lalu tumbuk sampai mengeluarkan minyak. 
3. Tambahkan 3 cup air, 200 ml kecap manis (atau sesuai selera, diicip dulu aja kurang apa). Masukkan garam, merica dan kelapa yg sudah ditumbuk. Biarkan hingga daging empuk, kurleb 1 jam (masak dengan panci ditutup ya)


ENGLISH VERSION


Last Lebaran, a friend of mine posted this super interesting recipe of Betawinese beef stew. Exactly what I'm looking for, for soooo long. Ipit, my friend, is a betawinese from both her mother and father. So, I put on my trust on her stew :D 


Betawinese beef stew is a popular food in Indonesia, the meat is tender, due to its long process, melt-in-your-mouth kind a thing, and full of spice. Beware, it can cause addiction! Despite its not-so-good appearance caused by the black color, trust me, my friend. You have got to try this!

You can click this link for the original recipe, I only make a small changes to the ingredients based on my liking.

Here is the recipe for by far, the most delicious Betawinese beef stew I've ever made.

You can simply change the beef with chicken and also add some veggies like carrots or green beans and make it even more healthy.


BETAWINESE BEEF STEW

1 kg of shank beef 
2-3 tbsp of grated coconut
250ml sweet soy sauce
3 cups of water
2 tbsp of cooking oil 
3 potatoes, cut into 4 and deep fry until half done

grind the following into spice paste
10 shallots
4 cloves of garlic
5 candlenuts
2 cm of ginger

2 lemongrass, mashed the white part
1cm of galangal, mashed
3 bay leaves
1/2 nutmeg, grated
salt
pepper

How to :
1. Cover all the shank beef with the spice paste, add 50 ml of sweet soy sauce and 2 tbsp of cooking oil, turn on the heat and cook until it watery.  Add in the galangal, nutmeg, bay leaves and lemon grass.
2. in the meantime, stir fry the grated coconut on a pan with medium heat without oil (pan roasted). Stir continuously until it fragrant and the color is golden brown a little bit. Mashed the coconut until you can see a little liquid comes out from the coconut (looks oily)
3. Add in 3 cups of water and the rest of the sweet soy sauce, you can add in more sweet soy sauce based on your liking, have a taste first. Add in salt and pepper to taste. Lastly, add in the mashed coconut. Cook with the lid on and leave it for at least 1 hour, until the meat is tender.

Monday, September 30, 2013

IDFB Challenge # 12 : Baked yoghurt chicken with mashed cassava


IDFB challenge #12 kali ini sungguh sangat menantang! Gimana ngga, di ultah yang ke 2 nya ini, member diminta untuk membuat makanan berbahan dasar singkong dan yoghurt. Nah lhoooo, gak nyambung kan. Mikir kerassss tp gak dpt2, eh ternyata belakangan saya baru ngeh kalo singkong yg dimaksud bisa jg menggunakan tepung mocaf (modified cassava flour) atau singkong yg sudah difermentasikan alias tape :D Kalo tape, masih banyak olahannya yang terlintas di dlm kepala saya. Btw, sudah pada tau belum sih kalau tanggal 7 Oktober itu kita merayakan Singkong Day? 
Yang pasti, singkong yang kaya akan gizi dan karbohidrat namun rendah gula itu dipadankan dengan yoghurt yang kaya kalsium dan sangat baik untuk saluran cerna, dijadikan satu menu, sudah pasti sehat :D 

Sayang disayang, saya kelupaan sama event ini. Baru ngeh lagi setelah teman2 bertubi2 posting hasil karya dapur masing2, yang tentu saja bikin handphone jadi ribut ting tung ting. Hahaha, lalu sayapun menyempatkan diri membuka grup lewat laptop, habis kalo dari smartphone kok notif masuk tp gak bisa dibuka :(

Setelah log in, kagetlah saya, hwaaaaa udah banyak kali yang nyerahin tugas. Dan hasilnyapun menggiurkan semua. Gimana dengan saya? *bengong*
Kali ini harus lbh semangat menyingsingkan lengan untuk masuk dapur :D Berhubung saya liat kebanyakan pada membuat makanan manis, saya pilih yg savoury saja. Udah ada rencana, besok setelah mengantar anak saya sekolah mau mampir ke pasar untuk beli singkong dan beberapa kebutuhan lain. Ternyata suami saya terburu2 pagi itu karena ada keperluan kantor, gak sempet ke pasar! udah gitu ketemu tukang sayur kok gak ngeh untuk berhentiin. Duh, akhirnya mengandalkan mas yg biasa lewat rumah yg datangnya pun tak pernah pasti! Udah pasrah saya, habis mau gimana lagi?

Wah, bener aja, sampe jam 1 siang gak ada satupun tukang sayur yang lewat. Mingkem deh saya, tp daripada gak ngapa2in, saya mengolah yang ada di kulkas aja. Kebetulan hari minggu kemarin habis beli ayam yg belum sempat dibumbuin. Jadi akhirnya improvisasi darurat! hahahahah, dulu pernah ada seorang teman yg membuat ayam bakar dengan bumbu mustard dan madu. Saya ganti deh, jadi yoghurt dan madu ditambah rempah2 yang simpel bgt. Gak pake repot deh pokoknya :D


Demikian resep ala saya :
6 potong ayam 
garam
1 buah lemon

untuk rendaman ayam :
3 sdm penuh yoghurt plain
1 sdm madu
1 sdt garam
merica
1 1/2 sdt air perasan lemon
3 siung bawang putih, diparut/diulek
italian pinch secukupnya*
butter untuk olesan 
*italian pinch ini bumbu andalan saya banget, terdiri dari : marjoram, thyme, rosemary, sage, oregano dan basil kering

untuk olesan ayam :
1 sdm madu
air perasan lemon
bumbu italian pinch, secukupnya

untuk mashed cassava :
300 gr singkong, dikukus lalu dilumat selagi panas
1/2 sdt garam, atau sesuai selera
lada secukupnya
seledri iris halus
keju parut, secukupnya sesuai selera

untuk saus yoghurt :
2 sdm yoghurt plain
1 sdm mayonnaise
1 helai daun mint, diiris halus
beberapa helai seledri, iris halus
garam dan lada, secukupnya

Cara Pembuatan : 
1. Lumuri ayam dengan garam dan air jeruk lemon, biarkan sekitar 20-30menit
2. Aduk rata yoghurt, madu, garam, merica, air perasan lemon, bawang putih parut dan bumbu italian pinch. Masukkan ke wadah dengan ziplock.
3. Masukkan ayam ke wadah platik ziplock dan lumuri dengan bumbu hingga rata. Masukkan ke dalam kulkas dan biarkan menyerap (sekitar 2jam)
4. Nyalakan oven 180 dercel 
5. Tata ayam di dalam baking pan yang sudah dialasi alumunium foil yang sudah dioles butter, tutup dengan alumunium foil, panggang sekitar 40 menit hingga matang dan kulit mulai berubah warna
6. Olesi masing2 ayam dengan bumbu olesan, ini membuat ayam warnanya jadi mengkilat dan cantik kecoklatan
7. Panggang lagi selama 15 menit hingga kulit menjadi krispi dan kecoklatan. Matikan oven, sisihkan ayam

Sajikan  ayam panggang dengan mashed cassava dan saus yoghurt.

Jadi akhirnya, di saat2 genting, sudah hampir jam 5 sore, datenglah tukang sayur! Sambil harap2 cemas saya panggil dan tanya. Alhamdulillah, memang masih rejeki saya ikutan challenge, hahaha, mas tuksay bawa singkong *jogedjoged*

Jadilah menu ini, yg menurut suami saya, enak :D mashed cassava yang sempet dikira mashed potato pun rasanya enak. Memang sudah saatnya kita melepaskan diri dari ketergantungan terhadap nasi! Apalagi singkong juga ngga bisa dipandang sebelah mata dengan kandungan gizi yang super padat dibanding dengan beras. 


Maafkan untuk foto yang ala kadarnya, cuma sempet jepret2 5 menit sebelum adzan maghrib berkumandang :)

Dengan ini saya ucapkan selamat ultah yang ke-2 untuk IDFB, makin keren dan asik aja yaaa! 


UPDATE : 
maaf teman2, krn nulis resep sambil mata nyaris merem, ada ingredients yang ketinggalan di bahan rendaman ayam, yaitu sejumput bubuk ketumbar. Thanks ya :)

Friday, September 27, 2013

Triple chocolate bread pudding


This recipe is exactly the same as the previous bread pudding, the differences are : I use chocolate bread, chocolate milk, choco chips, and I also add loadsa choco chunks. Should we call it "extreme choco bread pudding"? 

Its definitely a treat for the chocolate lovers around the globe, the chunks melted and make it even more chocolatey. I failed my diet, again. Heck, diet is just a "die" with a "t", some says. 

I don't put any sugar to this bread pudding as I use chocolate milk which is sweet enough, not to mention the choco chips and choco chunks :D :D 

So here it is, you can simply adjust the ingredients according to your liking :)


4 slice of chocolate bread 
200ml chocolate milk
125ml uht cream/cooking creme

pinch of salt
2 egss
1tbsp butter, melted

choco chips
your favorite chocolate bar or you can also use dark cooking chocolate

How to : 
1. Pre-heat your oven at 180 degree celcius
2. Grease your baking pan with generous amount of butter
3. In a mixing bowl, mix the cream, milk, sugar, egg, yolk, salt, and melted butter until well combined
4. Cut the bread into small pieces and spread half of the bread to the baking pan. 

5. Pour in half of the cream mixture, choco chips and choco chunks/dark cooking chocolate
6. Put the rest of the bread to the second layer, pour the rest of the mixture, sprinkle the choco chips.
7. Bake for 30 minutes or until a tooth pick inserted comes out clean. 


Less ingredients for a super yummy result. Addictive, it is :)

Thursday, September 26, 2013

Bread Pudding


For recipe in bahasa Indonesia, click  this link.

Leftover bread is always a homework for me. I don't want to waste it, but sometimes I have to think hard what to do with it. I usually make something simple, not time consuming kind of food. So this bread pudding is the answer. Its delicious, easy-peasy, n doesn't required so much ingredients and effort. Been trying many recipes, but this trial and error one is my favorite. 


Here is what you need : 
4 slice of bread
200ml plain milk
125ml uht cream/cooking creme

pinch of salt
3 full tbsp sugar
2 egss
1 egg yolk
1tbsp butter, melted

Cinnamon
Almond slice
Raisins
Powder sugar


How to : 
1. Pre-heat your oven at 180 degree celcius
2. Grease your baking pan with generous amount of butter
3. In a mixing bowl, mix the cream, milk, sugar, egg, yolk, salt, and melted butter until well combined
4. Cut the bread into small pieces and spread half of the bread to the baking pan. 

5. Pour in half of the cream mixture, sprinkle the raisins
6. Put the rest of the bread to the second layer, pour the rest of the mixture, sprinkle the raisin, almond slice and cinnamon.
7. Bake for 30 minutes or until a tooth pick inserted comes out clean. Add the powder sugar.

Tuesday, September 24, 2013

Strawberry yoghurt pudding


Yuhuuuuu its been a long time haven't visit my blog. A week is quite a long time, rite? Been busy with this and that and etc. 

I actually bake few stuffs, well, honestly re-bake some of my recipes from the past posts. Just to make sure that it worked really well. Haha that's a silly n dumb excuse. The truth is, me n my hubby looooove the lemon yoghurt cake that I baked few weeks ago n ask me to bake the same cake again for the third times! Need any more prove of how good it taste? :D

So, I guess it is time to move on. I make this pudding as per my son's request for a healthy snack. Tadaaaaa, here it is an easy to make yet delicious n hopefully healthy enough for children (and parents) daily snack : strawberry yoghurt pudding. 

I kinda grab anything that is available on the refrig, you can easily adjust the ingredients as you like. 


1 sachet of agar-agar powder (7gr), you can replace this with gelatin
250gr strawberry yoghurt
10 tbsp of sugar, or depending on how sweet/sour your strawberries
200ml of plain milk
200ml strawberry milk
250ml water
125ml cooking creme
325gr fresh strawberry, cut into chunks and process until smooth with blender
1 egg yolk, lightly beaten

As for the sauce, you can use your favorite vanilla sauce, but this time I make a simple strawberry sauce.

for sauce:
12 strawberries, process until smooth with blender
6 tbsp sweet condensed milk
1 tbsp sugar
water
=> mix all the ingredients together, put it on a stove an bring to the boil. Done

Method :
1. Prepare a pan, use a low heat position on your stove
2. mix the agar-agar powder with the sugar, water, and milk. Stir the mixture until it almost boil. Frequent stirring is needed.
3. Add about 4 tbsp of the mixture to egg yolk, mix well, and then pour it to the rest of the batter and stir well until it boiled 
4. Turn off your stove, wait until all the steam gone. 
5. Add in the yoghurt, creme and strawberry. Mix well.
5. Put it on your jelly moulds and leave it to cool. 

Unmould before eating and pour in the sauce...yummmmmm


My younger son looooove it so much he ate 3 moulds of the pudding at a time! as my eldest, he never likes anything with strawberry but he surprisingly managed to finish his first mould. Good job :D


Sunday, September 15, 2013

Brownies kukus ketan item/ black glutinous rice flour brownies


Who doesn't like.brownies? I certainly not on the list! 
Before I jump into blogging world, I've tried many varieties of brownies. Well, to be honest, most of them was not my homemade. It is easier to have the store-bought brownies at that time. But now that I finally find my passion for cooking, baking and food photography, I try to make the brownies myself :) 

Last time I made a banana brownies, which is so moist and decadent. This time, I'm making a glutinous black rice flour brownies. Its gluten free of course! And if you want to make it even healthier, skip the emulsifier. As long as you mix it properly the batter will get thicker even though it may need more time. 


This amazing recipe was taken from bunda Ricke's blog. You must try this, I've made this brownies twice in 10 days. My boys looove it. Eventhough the first few bites they gave me a weary look, but then they said that it was yuuuuuum and they keep coming back for more. A happy mommy, I am :)
This brownies have a different textures from other brownies due to the use of black glutinous rice flour. It slightly feel sandy in your mouth, but don't worry, its in a good way :)

Here's the recipe, you can click the link above for recipe in Indonesian :)

6 eggs
200gr sugar
1tsp emulsifier
1tsp vanilla
1/4 tsp salt 

2tbsp sweet condensed milk

250gr black glutinous rice flour
20gr chocolate powder 
=> mix it well with whisker

100gr of dark cooking chocolate, chopped and melted (I use microwave to melt the chocolate)
200gr of cooking oil/canola oil

Rice chocolate for layer

How to : 
1. Preheat your steamer 
2. Melt the chocolate (mine takes 3minutes on microwave), and then pour in the oil, mix well with whisker. Let it cool.
3. Mix the egg, sugar, emulsifier and salt with mixer on high speed until the batter looks pale white, thick and rising (mine took about 20minutes)
4. Add in the vanilla, mix well. Then add in the sweet condensed milk
5. Pour in the flour mixture, mix until well combined
6. Add in the melted chocolate+oil, then mix it with spatula until the batter looks homogen 
7. Grease 20*20*7 baking pan with melted butter and baking paper. Place half of the batter, steam for 10minutes. After that spread the rice chocolate (if using) and pour the remain batter and steam for another 20-25minutes.

Don't forget to cover the steamer lid with napkin or kitchen towel so that the water doesn't fall to the batter :)

As a prove that i did made this steam cake twice in 10 days, here another photo of the cake. I cut the cake while it still warm and look at the texture.......